


Inspirational glittery eye looks from Vena Cava‘s fall/winter 2011 presentation.
Hiya! Arabelle here with a makeup tutorial that is patently impractical—and inspired by the embellished-eye trend that’s been making the rounds for a while now—but who cares when glitter is so fun to play with?
What you’ll need:

• An eye shadow in the color of your choice. I picked light purple (“Glance,” from this palette by Stila) because it stands out on my eyebrows.
• A second eye shadow in a darker shade of the same color. Because I decided on the light purple shadow for my first color, I found a deeper shade of purple (“Improvise,” from the same Stila palette) to go with it.
• Glitter, preferably cosmetic glitter of a small, fine cut/size. You could get craft glitter because it’s cheap, but I would NOT suggest it. Cosmetic glitter tends to be smoother, gentler on the skin, and safer for your eyes if it happens to get in there (regs glitter can cause eye injuries that would be hard to explain to a doctor or insurance companies). I didn’t exactly follow my own advice, though, and used one of the INGLOT Nail and Body Art Spangles.
• Gel makeup adhesive. I like Gorgeous Cosmetics’ Glitz Fix Adhesive, and I think Urban Decay’s Bondage Weightless Makeup Adhesive is a great option, too.
• A flat eye brush. The one I have comes in a set.
• A small, rounded blending brush for eyes. You can find good ones like this at drugstores.
• Optional: cream eye shadow that is about the same color as your lighter eye shadow shade.
That’s all! Let’s get started.
Step One:

Smooth your eyebrows into place and then use your flat eye brush to fill them in with the lighter eye shadow, starting at the highest point of each brow’s arch and working your way to the outer end. I don’t really have arches, so I started applying shadow at my brows’ halfway points. You don’t have to be neat with this—you’re just setting up your base color.
Step Two:

Still using the flat brush, blend more of the same color into the skin just below the parts of your brows that you filled in with shadow. See the shape I’m slowly creating? I’m basically doing a smoky-eye, but instead of applying color to my eyelash lines, I’m putting it on and just below my brows. I’m still only using the light shadow, but I’m packing it on at the brow ends to make it look darker.
Step Three:
Now you’re going to use the darker eye shadow shade to create a gradient on the edges of the brows. Fill your rounded brush with the darker shade, then apply it through the outer ends of your brows and down toward the outer corners of your eyelids, like so:

Step Four:

After you apply the darker shade, it’s time to blend and perfect the shape of the combined shadows. I went back and added a little more of the lighter purple to my rounded brush. Then I blended it with the light and dark shadows I’d already applied, and used the brush to smooth the outlines of the curved shapes those shadows made.
Step Four-and-a-half:

OK! Before we get into the glitter portion of this tutorial, you can also use your flat brush again to line your upper eyelids with the lighter eye shadow, if you want an extra pop of color up there. This step is totally optional, though! I applied the tiniest amount of light purple shadow along my upper lash lines, focusing the color in the inner corners of my eyes and blending it outward from there. NOTE: Instead of the light purple eye shadow I’d been using, I substituted the light purple cream shadow shown above. Don’t let this throw you off! Like I said, you can line your eyes with same light shadow you used in the first and second steps, or none at all. Totally up to you.
Step Five:

Now you’re going to apply the gel adhesive. Using the product’s applicator, add a thin layer only to the areas where you’re going to put glitter. I decided I wanted sparkles below my brow lines and on my eyelids, so that’s where I put my gel.
Step Six:

Next, add your glitter! I didn’t have a light purple cosmetic glitter in the size shown in the example pictures, so I just used the one I already had that came closest in terms of color. Try whatever you have on hand (as long as it’s safe to have near your eyes) and experiment! If you decide to apply two sizes or kinds of glitter, apply the smallest and/or lightest kind first. Slightly dampen your brush with gel adhesive to get the glitter to stick its tip, add your glitter, and then tap the brush on the areas of your eyes where you already applied gel to get the glitter to stick. This can be messy. It helps to have a cotton swab on hand to wipe off stray sparkles or to poke pieces into the exact places where you want them.
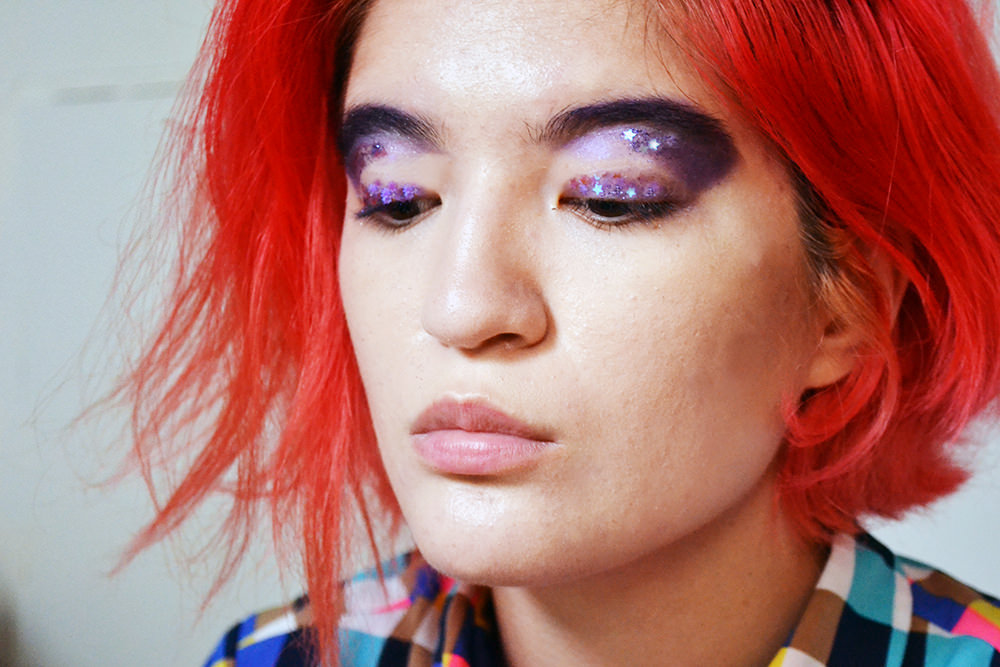
Voilà! This is a loose interpretation of the looks I was inspired by, and yours can be a loose interpretation of MY look. There really aren’t any rules. Do what feels right, fix it if it doesn’t come out the way you wanted, and appreciate the little surprises that come along the way, ’cause they can be interesting looks in and of themselves! Makeup is kind of magic like that. ♦