


Ruffle socks are a great addition to any outfit, especially when you wanna give off some super-sweet springtime vibes. They’re as wearable on the street as they are on the runway. While you can easily find a pair at practically any clothing store, I’m not into dropping $10 or more for something that is so DIY-able. I have a feeling that you guys aren’t either, so today I’m going to show you an easy way to transform ANY pair of tired old socks into ~rad ruffle socks~. Absolutely no fancy sewing skills required! I actually think this is the easiest (and possibly the cutest?) DIY I’ve come up with so far.

You’ll need:
- One yard of ruffled lace trim. You can find this at any craft or fabric store.
- Two pairs of snap closures. I’m using prong-backed ones for this tutorial, but the sew-on kind work just as well. No-sew snaps will come with either open prong rings or a mix of open and capped prong rings—the cap serves a decorative function, which I like.
- Scissors
- Fray Check
- A pair of socks
- Snap pliers or hammer (optional—this is for the prong-backed snaps)

1. Wrap one end of the lace trim around the area just above your ankle. It should be snug enough that it won’t easily slide down, but not so tight that you cut off your circulation! Mark where the two ends overlap, allowing for about one inch of overlap.

2. Cut your lace at that overlap point. Cut another piece of lace identical in length to this one.
3. These two pieces of trim will be your sock ruffles! Now all you have to do is finish them and add some closures.

4. Finish the raw edges of each piece of lace with a little Fray Check.

5. Now take one of the ruffles and a pair of snaps. With the inside of the ruffle facing you, attach the snap to the upper corner with the stud (the part that looks like a nipple) facing out. See the two photos below. If you’re using the prong-backed closures, you can just push the prong ring through the front of the fabric, where you see the left-most X below, and attach the stud to the prongs. The easiest way to do this is with snap pliers, which I didn’t have. You can also buy a snap kit with a metal tool that you place on top of the snap, and then hammer a few times to secure. (Check out this tutorial if you need more guidance.) Next, flip the ruffle over so it’s right-side up again and attach the other half of the snap—the socket—to the opposite side, about one inch away from the corner (so the lace will overlap). Push the prong ring through the back of the ruffle and attach the socket to the front, where it will fit the stud when closed.


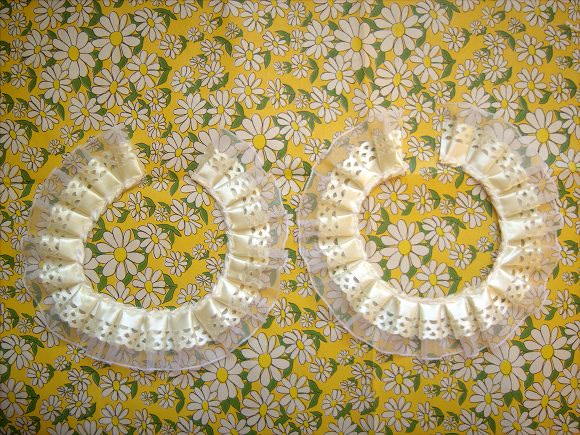
7. When you’re done, your snap placement should look something like this. Repeat this on the other ruffle, and you’ll be good to go!

8. And here are your finished sock ruffles! Just snap ’em on over a pair of socks, roll the cuffs over, and go be frivolous and free. ♦