FAR OUT.
Hello, hello my psychedelic sweeties! It’s time for another mani tutorial, this time in the form of drippy, trippy nails!
This manicure is inspired by late-’60s and ’70s black light posters, and an awesome black-light miniature golf park I recently went to in Canada. (Black + neon is a pretty bomb combo, if you ask me.) It’s a similar look to the Halloween-themed ghoulish nails we did a few years back, but I made a slight change to the drip technique. Don’t worry—it’s still pretty easy to do!
What you’ll need:

- Black nail polish. I used Milani’s Black Swift.
- A bright blue polish, like Revlon Colorstay Coastal Surf.
- A neon yellow polish. Mine was Floss Gloss’s Con Limon, which is a kind-of blend of yellow and green.
- A neon pink polish. I used China Glaze’s Flip Flop Fantasy.
- A neon orange polish, like Milani’s Jiffy Orange.
- A neon green polish. I used Santee’s Vikini Green, which is hard to find. But this one—Loopy Lime by Salon Perfect—would be even more awesome.
- A clear base coat. My favorite is Seche Clear Crystal Clear Base Coat.
- A clear top coat. Seche Vite Dry Fast Top Coat is my go-to.
- A dotting tool kit or bobby pins.
- Not pictured: Nail polish remover and cotton swabs or a small nail-art brush for cleanup.
How to do it:
Step One

Paint all of your nails with the base coat. Once it dries, paint your nails black.
Step Two

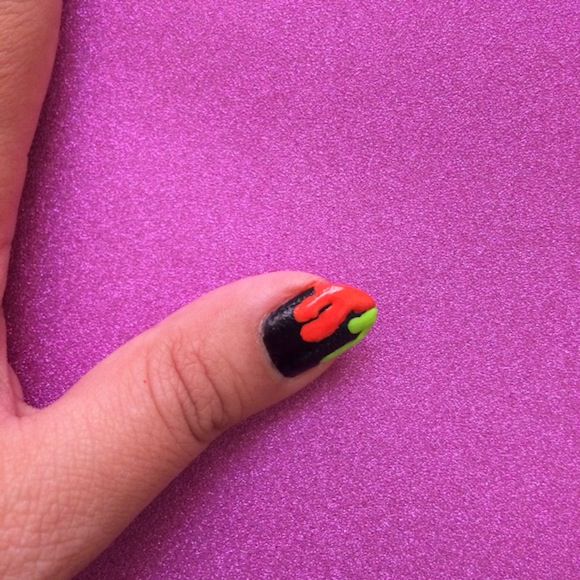
For this particular nail, I am doing half of my drips in neon orange, and the other half in neon green. Using the first color of your choice, paint a line across one-half of the tip of your nail. Below the line, make two or three dots in the same color using a dotting tool or bobby pin. Repeat the same techniques on the other half of the nail with a second color.
Step Three

Pick up a clean dotting tool or bobby pin and lightly dip it into the first polish color’s bottle, then use it to gently drag polish, in a straight line, from the tip of your nail to one of the dots of the same color. You might have to reload your tool/bobby pin with polish and trace over the same line a couple of times to fill out your line and make it look nice and drippy. Then, repeat the same steps to connect the stripe of polish on the tip of your nail to the other dot(s) that you drew in the same color. Once that’s done, start from the beginning of this step, and follow it through on the other half of your nail in the second color.
Step Four

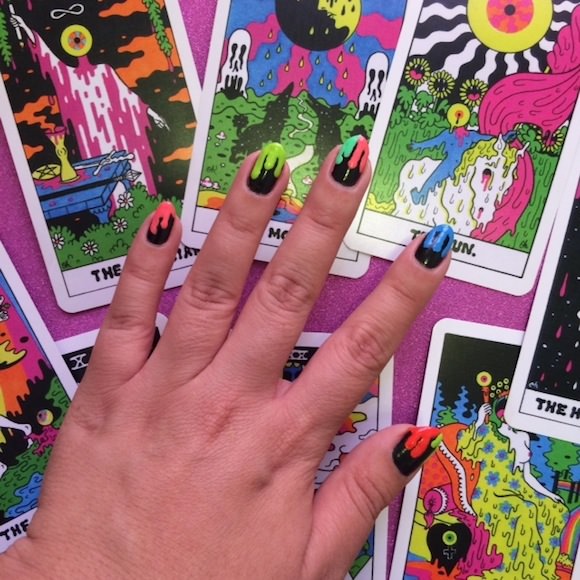
Repeat the process in Steps One through Four on the rest of your fingers, mixing up neons as you go!

You can also opt for just one polish!
Step Five
After you complete your drips, let the polish set for a few minutes, then finish it all off with a clear, protective top coat.

Whoa, soooo trippy! ♦