


Hi! Today I’m going to show you how to make this easy, breezy, 100 percent do-it-yourself wrap skirt. I say 100 percent DIY because you’re basically going to be doing everything but weaving the fabric yourself. But never fear! This project requires a chunk of time and some basic sewing knowledge, but you won’t need to worry about doing any fancy fitting or stitching techniques like inserting zippers to get the final look. It’s just a few straight seams, a bit of hemming, and you’re done.
What you’ll need:
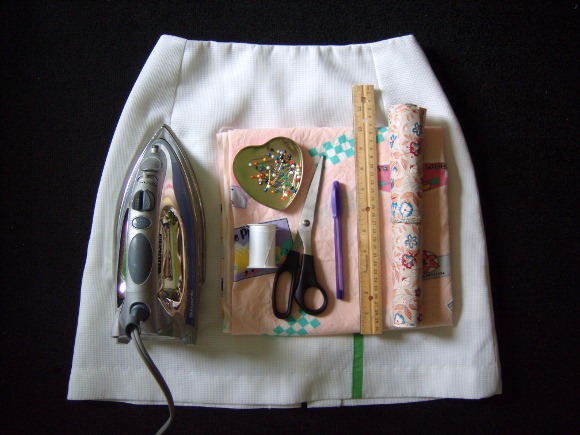
- Newspaper, wrapping-paper remnants, or pattern-making paper
- A favorite skirt. One with an A-line shape would be ideal!
- Straight pins
- A pen
- Scissors
- A ruler
- Fabric! I used a printed cotton for mine. The amount of fabric you’ll need depends on your size: From my experience, two to two-and-a-half yards is what you’ll need for small to medium sizes, and three to four yards is what you’ll need for large to extra large sizes.
- A needle and thread or a sewing machine
- An iron
How to do it:
Step One
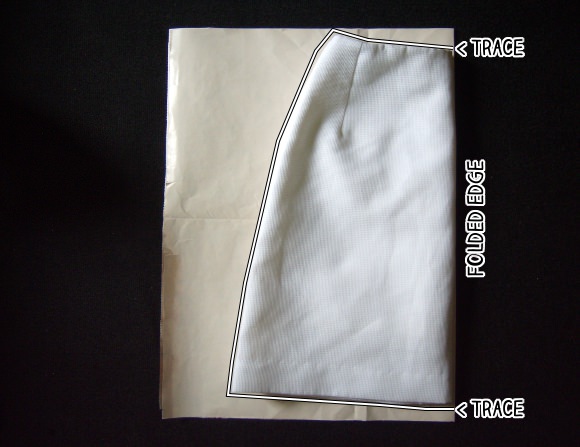
You’re going to start by making a pattern for the skirt, using a skirt you already own as a template. Fold two sheets of paper (I used old wrapping paper) in half. Fold your skirt in half, too, and line up the fold of the skirt with the folded edge of the paper. Use straight pins to pin the skirt to the paper, or weigh it down with something heavy, then trace all the way around the skirt.
Step Two

Once you have the pattern’s basic outline, you’re going to make what’s called a seam allowance around it. (A seam allowance is the distance between a fabric’s intended seam line and its cut/raw edges.) Use a ruler to measure and mark dashes a half-inch away from the original skirt outline, like I did in the photo above.
Step Three

Draw a line connecting the dashes you just made. Now you have a half-inch seam allowance all the way around the pattern’s original outline.
Step Four
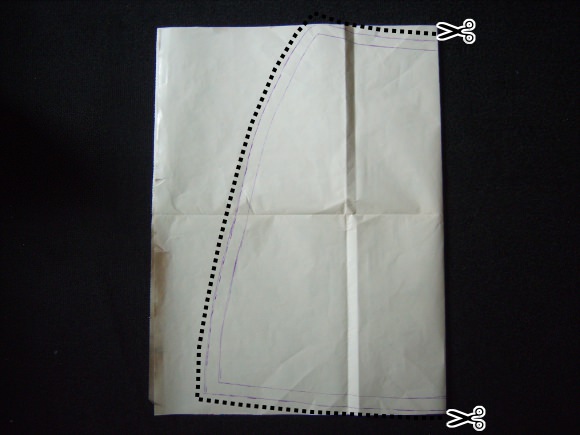
Cut your pattern out along the seam allowance that you just sketched.
Step Five

After cutting the pattern and unfolding the paper, you should have two identical skirt-shaped pieces of paper. We’ll refer to these as pattern pieces #1 and #2.
Step Six

Take pattern piece #1 and cut it exactly in half. Keep one half and get rid of the other.
Step Seven

On pattern piece #2, measure about three inches in from the right-hand side of the pattern. Make a mark there, and cut straight down from that point. Discard the right-hand side (the smaller side).
All right! Your finished pattern pieces should look something like this:

Pattern piece #1 will serve as the front and back of the wrap skirt, while pattern piece #2 will be the overlapping part of the skirt’s front.
Step Eight

Fold your fabric in half. If the fabric has a patterned or printed side, make sure that side is facing out when you make the fold. Lay the pattern pieces out the same way I did in the photo above: Place pattern piece #1 on the fold of the fabric. Place pattern piece #2 on the side opposite to the fold (aka the selvage, which is the fabric’s non-frayed, finished edge). Pin the pattern pieces into place; cut out the fabric accordingly:

After cutting your fabric, you should have two full skirt-shaped pieces, which will serve as the front and back of the skirt. You’ll also have a third piece that’s shaped like half of the skirt—this will be the piece that overlaps in the skirt’s front after everything is sewn together.
Step Nine

With the remaining fabric, cut out two straps/ties (I made both of mine three-and-a-half inches wide by 25 inches long). Also cut a small rectangle of fabric to make a belt loop (I made mine one inch wide by two inches long).
Step Ten

Now all these random bits of fabric are going to start looking like an actual garment! First, you’re going to sew the skirt’s straps. Start by folding each strap piece lengthwise (with the patterned/printed sides facing each other on the inside of the fold). Pin the straps like I did in the photo above. For each strap, sew a straight line a half-inch away from the raw edges of one short side and two long sides. Then, using the opening at each strap’s un-sewn short side, turn the strap right-side out, so the fabric’s pattern/print faces out. Good work!
Step Eleven

Heat your iron, and press the straps flat. Do the same with the little rectangular belt-loop piece, too. Your finished straps and belt loop should look something like the pic above. Set them all aside for later.