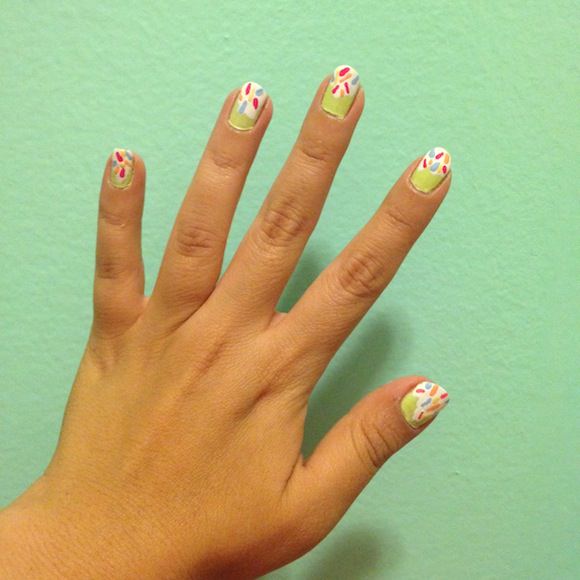
I scream, you scream, we all scream for ICE CREAM NAILS! On a hot summer day, the only thing better than enjoying a scoop of your favorite icy treat is matching it to your manicure! This drippy ice-cream-inspired DIY is simple to do and easily customizable: You can use any combination of colors your heart desires to reflect your (literal) taste in flavors. Let’s begin!
What you’ll need:
- Five or six nail polishes: a base color of your choosing, white, blue, pink, and orange or yellow (or both). What I used, respectively: Deborah Lippmann’s Spring Buds, Formula X’s White Matter, Deborah Lippmann’s Blue Orchid, Revlon’s Passionate Pink, and Deborah Lippmann’s Tip Toe Through the Tulips and Build Me Up Buttercup.
- A top coat. Mine, as always, is my trusty Seche Vite.
- A paper plate or another disposable palette you can get polish all over.
- A dotting tool like this one or a bobby pin.
How to do it:
 1. Paint your nails with your base color. I chose a pastel mint green, although this could also be interpreted as pistachio! Let it dry completely.
 2. Create a whipped cream effect by painting the top third of your nails with your white polish, then carefully dragging your brush down to the bottom of each nail, making your strokes thinner as you go. To avoid a melty-looking sundae mani, let this dry, too.
 3. Pour a bit of each of your remaining polishes onto separate areas of your palette.
4. Quickly, before the puddles dry, dip the end of your bobby pin or dotting tool into one of them and lightly drag it across the white polish in a tiny line until it resembles a sprinkle. Repeat this with your other colors, wiping your tool clean between shades so you don’t accidentally mix ’em up.
 5. Let the sprinkles dry, then finish the job by painting your nails with your top coat. The best thing about this manicure is that, unlike ice cream, it’ll stay put in the summer heat.
6. Admire your handiwork (get it?)—your nails have never looked sweeter! ♦


